Products
Overview
With Products in Orbit, you can define the logistical products you offer to your customers, partners and suppliers. Similar to how parcel services offer various well-defined shipping products for parcels (Economy, Express, Courier, Premium, etc.) based on factors like size, weight, price, or transit times, Products in Orbit combine timing calculations, routing, feasibility assessments, commercial terms, and line-item based pricing. Orbit Products are applicable to all transport and delivery processes, not limited to specific use cases like parcels, last mile, or FTL/LTL.
Who this is for. This article is the technical authoring reference for building Products — it assumes you will be writing ProductBrick logic in TypeScript in Orbit MissionControl. If you only want to understand what Products are and how pricing works, in plain language and without any code, read the Understanding Products & Pricing overview instead.
Products are a powerful and flexible tool that allows you to accurately reflect your logistical and commercial offerings on the Orbit platform - in terms of pricing and service levels. Products can be used for selling (shipper-facing) and purchasing (carrier-facing) of transports.
Each Product has four key logic components, along with some additional configuration: Context, Feasibility, Pricing, and Scheduling. These logic components are called ProductBricks.
ProductBricks logic is defined using the TypeScript programming language to provide maximum flexibility while preserving maintainability. Orbit provides a feature-rich, built-in code editor that includes advanced functionalities such as code-completion and syntax highlighting. Orbit's code editor is specifically designed to assist developers in efficiently managing and writing ProductBrick code.
While code is an excellent way to represent logic, most product logic also needs to access structured data at some point. This can be a zoning table with prices, a list of supported countries or simply a bunch of multipliers to use when calculating a price (e.g. for distance based pricing). Orbit DataPools provide the ability to store structured data and easily access them from within the logic of ProductBricks.
In the following docs article you will get detailed insight into Orbit Products and their components as well as some examples and snippets to get you started with products.
Creating and Managing Products requires basic programming knowledge. Specifically knowledge about the TypeScript or Javascript programming languages. If you want to learn the basics of TypeScript we recommend the following online course: https://www.codecademy.com/learn/learn-typescript
If you need any assistance with defining Orbit Products, please do not hesitate to reach out to your Orbit representative. They are available to provide you with the necessary support and guidance. Whether you have questions about configuring Product settings, integrating various functionalities, or troubleshooting any issues, your Orbit representative is there to help.
Key Concepts and Features
ProductBricks
ProductBricks are the building blocks of Products in Orbit. There are four types of ProductBricks:
Context
The context brick runs prior to all other bricks of a product. It generates a context object that is accessible by all other bricks via the
contextparameter.In general the context brick should contain logic that is shared by or used in multiple other bricks. Typically this includes: calculating a route, finding the correct vehicle class, etc pp.
A product must contain exactly one context brick.
Context bricks can return an optional
messagesarray containing alerts with severity levels (info,warning,error). These messages are displayed to users during the booking flow and on order details. See Product Messages for details.Return type (
ContextFunctionResult):Field
Type
Description
isFeasiblebooleanWhether the product is feasible given the transport request
result{ route?, context }Context object passed to all other bricks. Place route data in
routeand custom data incontext.errorsRecord<string, unknown>(optional)Error details if the product is not feasible
isRequestableboolean(optional)If
true, the product is shown as requestable even when not feasiblemessagesBrickMessage[](optional)Alerts with severity levels (
info,warning,error) and localised text
Feasibility
Feasibility bricks determine whether the product can be used to create an offer for the transport request under given conditions.
Feasibility checks can differ vastly for different use cases. Examples include: Checking maximum load dimensions or weight, checking supported origin or destination countries, etc pp.
A feasibility brick generates a boolean (true/false) value signalling feasibility, optional error messages to explain to the user why the product is not feasible, and optional
messageswith severity levels. See Product Messages.A product can contain multiple feasibility bricks, the results of which are combined using logical AND for feasibility values and list merging for error messages.
Return type (
FeasibilityFunctionResult):Field
Type
Description
isFeasiblebooleanWhether the product can fulfil the transport request
errorsRecord<string, unknown>(optional)Error details explaining why the product is not feasible
isRequestableboolean(optional)If
true, the product is shown as requestable even when not feasible. Most restrictive value wins across multiple bricks.messagesBrickMessage[](optional)Alerts with severity levels and localised text
Pricing
Pricing bricks calculate the price of a product for a given transport.
In many cases pricing logic is either based on distance and/or time of the calculated route or a zoning table stored in a DataPool. But pricing bricks also allow pricing logic to have a completely different structure.
A pricing brick generates a list of line items. Line items are very similar to the accounting positions on an invoice. Each line item consists of count, name, monetary value and tax percentage.
A product can contain multiple pricing bricks, the generated line items are combined using list merging. The sum of all line items from all the pricing bricks of a product represent the price of the product for a given transport.
Return type (
LineItem[]):Field
Type
Description
type"base" | "item" | "discount"Category of the line item
subtypestringFurther classification (e.g.
"fuel_surcharge","base_rate")namestringDisplay name of the line item
descriptionstring(optional)Additional description text
countnumberQuantity (e.g. number of kilometres, pallets)
amountnumberMonetary value per unit
amountType"fixed" | "percentage"(optional)Whether
amountis a fixed value or a percentage. Defaults to"fixed".vatPercentagenumber | nullVAT rate as a percentage (e.g.
19), ornullif not applicablevoucherstring(optional)Associated voucher code, if applicable
Scheduling
The scheduling brick determines the available schedule for a transport by configuring a multi-stop scheduling wizard. Each stop receives its own set of scheduling options, date constraints, and transit rules.
Scheduling bricks call
utils.scheduling.buildSchedule()and return the resultingScheduleobject directly. The function accepts per-stop configuration (options, operating hours, disabled weekdays, earliest/latest dates) along with user selections and optional recommendations.Each stop supports three option granularities: fixed time (user picks an exact time), fixed time window (operator-defined window such as 08:00–12:00), and flexible time window (user picks a window within operator-defined bounds).
Consecutive stops can define transit constraints that enforce a minimum travel duration between stops, anchored to either the start or end of the preceding stop's selected window.
A product must contain exactly one scheduling brick, as they are not combinable.
Note: The scheduling brick is ignored when booking a transport through the TransportComposer in Orbit MissionControl or via the Orbit API.
Each ProductBrick is defined using TypeScript code in Orbit's built-in code editor. The editor provides features like syntax highlighting and code completion to assist in writing clean and functional code.
The code to calculate products is executed in an isolated execution environment providing a high degree of security.
Brick Messages
Context and feasibility bricks can return an optional messages array alongside their standard return values. Each message has a severity level and localised text:
// Inside a context or feasibility brick
return {
  isFeasible: true,
  result: { route, context: {} },
  messages: [
    {
      level: "info",
      text: { en: "Route includes toll roads", de: "Route enthält Mautstraßen" },
    },
    {
      level: "warning",
      text: { en: "Approaching weight limit", de: "Gewichtslimit fast erreicht" },
    },
  ],
};
Severity levels:
info— general information about the offer or transport conditionswarning— conditions that may affect the transport but do not prevent bookingerror— critical issues the user should be aware of
Messages from all context and feasibility bricks of a product are collected, deduplicated, and sorted by severity (errors first, then warnings, then info). They appear as colour-coded alerts in Orbit MissionControl and Orbit Hub — on product cards during booking and on order details after the order is placed.
The text property uses the Localization format, supporting multiple languages. The message is displayed in the user's selected language.
Messages are informational only and do not prevent booking. Use the isFeasible return value to control whether a product can be booked.
For more details on how messages appear to users, see the Product Messages documentation.
DataPools
DataPools are collections of structured, tabular data accessible by multiple ProductBricks. They are ideal for storing information such as a list of vehicle classes or a zone-based price matrix. By centralising this data, DataPools ensure consistency across different Products and simplify the maintenance of pricing information.
To use a DataPool within a ProductBrick, you must first link the two together at the bottom of the form for editing a ProductBrick. Once linked, a DataPool can be easily accessed in ProductBrick functions via its name, which is suffixed by a random constant on the data input parameter. Our code editor will make linking a DataPool easy utilising Orbit's code completion & suggestions.
To facilitate easy retrieval of various data types and formats from DataPools, Orbit provides several utility methods. For more information and examples, please refer to the documentation below.
Products
Products are the objects that this is all about. It is what is offered to a customer (Shipper) or service provider (Carrier). A product is a combination of several ProductBricks together with some metadata and commercial terms.
A product can be sold to a customer or used to purchase a service from a service provider (e.g. Carrier). It is also possible to use the same Orbit Product for sales and purchasing. To reflect these use cases a product can be created in one of three categories: Purchasing, Sales or Sales & Purchasing. The category controls at which points and to which user groups the product is displayed in the Orbit system:
Sales products can be used to calculate a price in Orbit TransportComposer when creating an Order. They can also be offered to customers in Orbit Hub.
Purchasing products can be used to calculate costs in the TransportComposer when creating a Tour. They are also used everywhere a tour is created or significantly edited (e.g. when routing a Shipment or optimising a Tour).
Product availability states
In addition to feasibility and pricing, Products can be requestable or unavailable.
This results in three possible states:
Offer (type: "offer")
Feasible, price calculated → can be booked directly
Request (type: "request")
Not feasible or no price, but isRequestable: true → request possible
Unavailable (type: "unavailable")
Not feasible or no price and isRequestable: false → shown as unavailable
Each of these three outcomes is a valid, faithfully-recorded result — not an error to fix. A Request or Unavailable answer is genuine information about a specific transport: this move cannot be quoted automatically, or cannot be carried under the given conditions. Such results usually carry a message explaining why — for example, a load that exceeds the weight limit, or a route outside the supported area — which is surfaced to the user (see Product Messages). Relay that reason rather than treating a missing price as a fault; the very same Product returns a bookable Offer for a different transport that meets its conditions.
isRequestable can be defined on the Product or set dynamically by FeasibilityBricks. If multiple FeasibilityBricks return isRequestable, the most restrictive value applies (false wins).
// Feasibility Brick
return {
  isFeasible: false,
  isRequestable: false
};
Versioning
Products, ProductBricks and DataPools come with time-based versioning functionality. This means that old versions of products remain available and planned updates to price models are easy to implement.
Every edit to a Product, ProductBrick or DataPool creates a new version with a validity date that indicates the start of the validity of this product. When a product is requested the version valid at the time of the start of the transport is used to retrieve the Product version valid at that point in time. This means the start time of the transport is used as the timestamp to choose the product version.
On Orders and Tours which are priced using a product, the used product version is displayed on the detail pages in MissionControl together with the Product name to allow for a maximum of transparency.
Availability Restrictions
If, where and for whom products are available can be controlled by availability restrictions. These are given in the form of queries that check against values of Carriers (for purchasing products) or Shippers (for sales products) and their respective users and teams.
If no restrictions are specified, the product is available for all Shippers and Carriers.
When restrictions are specified, a product is only available if all specified conditions are met. It's important to note that these restrictions are applied only when the respective Shipper or Carrier is known at the time of product calculation. For example, this occurs when a shipper is selected in the TransportComposer. If no shipper or carrier is selected, the product remains available despite any defined restrictions.
Products in Hub and TransportComposer have an additional filter layer for products:
To use a product in Hub it needs to be explicitly activated in the Shop Settings (these settings can be adjuste in MissionControl) for that shop. After the product is activate there, additional availability rules still apply if they are configured. Unlike in MissionControl, unavailable or disabled products are not shown in Hub. A shipper that does not pass the availability filters for a product, does not see this product in Hub.
To use a product in TransportComposer, it needs to be explicitly activated in the associated TransportShape. After the product is activated there, additional availability rules still apply if they are configured.
Walkthrough
In this walkthrough, we will create a simple Product to explain core concepts in detail. Our Product will include:
ContextBrick with routing function for calculating the distance and duration of a route
PricingBrick that generates a line item for the base price
DataPool with variables used for price calculation
Simple FeasibilityBrick checking for load limitations
SchedulingBrick that takes route duration into account
In additional steps, we will demonstrate how we can enhance our product with the following functionality:
Add zone-based pricing with a zoning table from the data pool
Dynamically react to shipper or carrier properties
1. Calculating a route in a ContextBrick
The product we are creating in this walkthrough will calculate prices and runtimes based on the route calculated for the requested transport. We will do this in the ContextBrick of our product.
In the "ProductBricks"-Tab in the settings area of MissionControl, create a new ContextBrick by clicking the "Create ProductBrick" button in the ContextBrick section. Enter a name and description for your ProductBrick. There is no need to link a DataPool for now. Click "Create".
Find your newly created ContextBrick in the list and click the "expand" button. Click "open code editor" to edit the logic. Unlock the code editor by clicking on the lock icon in the bottom left corner of the editor window. We are now ready to create the logic for our product brick by editing the bricks code. Notice how the first and last row of the code can not be edited as these designate the format of the bricks function. Our custom code goes into the body of this function.
To calculate a route we first need to create a route request. This request contains the start and end points and some configuration options that the system needs to calculate a route. The request is just a data object in a certain format and we could create it from scratch in our code. But it is easier to do this using the
buildRouteRequestutility method. Add the following code into your brick:
const routeRequest = utils.route.buildRouteRequest(
	input.request.tour?.stops.map((s) => s.geocoded) ?? [],
  { transportMode: "truck" }
);
This code passes the coordinates for all stops from the incoming transport request as the first argument to the buildRouteRequest method. The second argument is the options object and sets the mode of the transport to truck to tell the routing service to respect road restrictions for this vehicle class. You can add additional options to the object.
utils.route.buildRouteRequest is a utility function that builds a simple route request suitable for basic use cases.
For more advanced use cases we recommend constructing the request yourself and passing it to utils.route.calculateRoutes, which gives you full control over all routing parameters.
The object you pass into utils.route.calculateRoutes is fully typed, so the available types guide valid input values and surface helpful editor hints and compile-time checks. For example:
const origin = input.request.tour?.stops?.[0]?.geocoded.position?.lat + "," + input.request.tour?.stops?.[0]?.geocoded.position?.lng;
const destination = input.request.tour?.stops?.[1]?.geocoded.position?.lat + "," + input.request.tour?.stops?.[1]?.geocoded.position?.lng;

const [route] = await utils.route.calculateRoutes([
    {
        origin,
        destination,
        transportMode: "truck",
        vehicle: {
            height: 280,
            length: 1300,
            width: 240,
            grossWeight: 40000,
        },
        tolls: {
            emissionType: "euro6",
        },
    },
]);
The route request object exposes all parameters of the HERE Routing API in an objectised form; consult the HERE documentation for the full list of fields and accepted values: HERE Routing API documentation.
Now that we created the route request we need to send it to our route service to get the route. Add the following code below the code block added before:
const [route] = await utils.route.calculateRoutes([routeRequest]);
We retrieved a
routeobject from our routing service. The route object contains information like distance, duration and so on. We will extract and use this information in the following steps. For now we will return theroutefrom the context brick, so that all other bricks (e.g. PricingBrick) can access and use the route data. Add the following code right before the closing brackets of the function:
return {
    isFeasible: true,
    result: {
      route,
      context: {},
    },
  };
The context function has a fixed return format that contains two types of information:
The
isFeasiblefeasibility flag to signal if the requested transport is feasible with this product. As we are not doing any feasibility checks in our context brick at the moment we are returning the fixed valuetrue.The
resultof the context brick that is provided to all other bricks. This can contain a route in the designatedroutekey and a other data (which is empty right now) in thecontextkey.
2. Simple Feasibility
Now that we have generated the context for our Product which contains route information, we will implement a simple feasibility check. Lets say our Product is feasible if two conditions are met: 1. the total transport distance is below 1000km and 2. the total weights of all loads is below 27t. Of course in most cases these feasibility checks will be more comprehensive. But we will stick with these simple checks for now. Lets implement them:
In the "ProductBricks"-Tab in the settings area of MissionControl, create a new FeasibilityBrick by clicking the "Create ProductBrick" button in the FeasibilityBrick section. Enter a name and description for your brick. There is no need to link a DataPool for now. Click "Create".
First we are going to make sure that the transport distance is below 1000km. We can access the route we generated by accessing the context parameter that is passed into our function. Because route objects are complex and contain a lot of complex data, Orbit provides utility functions to make working with routes easier. One of these utility functions is
getVehicleSectionDistanceSumwhich takes a route object as input and outputs the total route distance that needs to be travelled by vehicle (excluding route sections by ferries etc). We are going to use this function to get the total route distance and check if it is under 1000km. Note that distances in orbit are usually given in meters, we need to bear this in mind when comparing. Add the following block to the feasibility function:
const distance = utils.route.getVehicleSectionDistanceSum(context.route!.routes[0].sections);
const isDistanceBelowLimit = distance <= 1000 * 1000;
Now that we have calculated our first condition, lets move on to the second: total load weight must be below 27t. Because a transport can have multiple stops with loading and unloading actions it can be difficult to find out what the maximum load weight is for a transport. Again, Orbit provides a utility method to make this easier. This utility method is called maxWeightForStopCountAndLoads and takes in the number of stops a transport has and the loads transported and outputs the maximum weight. We will use this utility to calculate the maximum and check if it is below our limit of 27t. Weights in Orbit are given in kg, so we have to convert tons to kg before comparing. Add the following code to the feasibility brick right below the code added before:
const maxTotalWeight = utils.loads.maxWeightForStopCountAndLoads(
    input.request.tour.stops.length,
    input.request.tour.loads
  );
const isWeightBelowLimit = maxTotalWeight <= 27 * 1000;
Great! We now have calculated our two conditions and saved them in the variables
isDistanceBelowLimitandisWeightBelowLimit. We now want to signal, that our product is feasible if both conditions are met. To do this we combine the two conditions using the logical AND operator&&and return the value in theisFeasiblekey in our function.
return {
	isFeasible: isDistanceBelowLimit && isWeightBelowLimit
};
Perfect. We created a simple feasibility function that checks two conditions.
3. Parameterised Pricing
We have already created a context containing route information and handled the feasibility of our Product. Now we can get to the core function of our Product logic: price calculation. We will create a DataPool with the constants used in the calculation of our price. We will then access this data from within our logic and use it to calculate the price. Let's go.
In the "DataPools"-Tab in the settings area of MissionControl, create a new DataPool by clicking the "Create DataPool" button. Enter a name and description for your DataPool. Click "Create".
To fill the DataPool with the data we need, click the "view & edit"-button in the top right corner of our newly created DataPool. A window containing the DataPool's data will open. Use the lock icon in the bottom left corner to unlock the DataPool and enable editing.
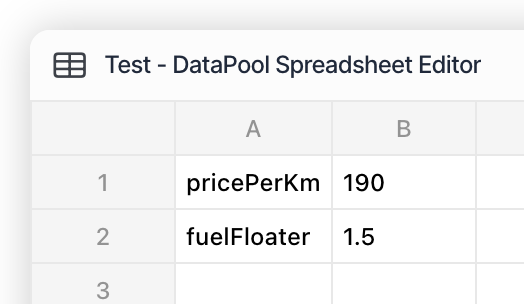
For the simple price model we are going to create, we only need two constants: the price per kilometer and the current fuel floater. It is possible to define much more complex data in DataPools, including lists and matrices (e.g. zoning tables or class based price lists). We are going to demonstrate this in a different example. For now enter the two constants next to their names into the DataPool. You DataPool should look like this:
Click the save button to save the DataPool.
We are now going to create the PricingBrick inside which we will use the DataPool we just created. In the "ProductBricks"-Tab in the settings area of MissionControl, create a new PricingBrick by clicking the "Create ProductBrick" button in the PricingBrick section. Enter a name and description for your brick.
Open the code editor for our newly create brick and start editing it. DataPools can be retrieved using the function
utils.dataPools.getDataPoolsByNames.
You can access the data in your DataPool by calling:
const [yourDataPool, otherDataPool] = await utils.dataPools.getDataPoolsByNames(
	["YourDataPool", "OtherDataPool"]
);
To make it easier to access data store within a DataPool, orbit provides two utility methods:
getSheetColumnsandgetSheetRows. These utilities extract specified columns (or rows) from a sheet into a typed matrix. We want to extract the column "B" into a list (1D matrix) of floating point numbers. Because we want to extract a column, we are going to usegetSheetColumns. Add the following block of code to the body of the PricingBrick.
const constants = utils.dataPools.getSheetColumns(
    yourDataPool["Sheet 1"],
    { startRow: 0, endRow: 1, parser: parseFloat },
    1
)[0];
The first argument of getSheetColumns is the sheet we want to read the data from. Each DataPool contains multiple sheets, similar to a spreadsheet document. The default name for the first sheet is "Sheet 1", but this name can be changed in the bottom left of the DataPool editor where you can navigate between sheets. The second argument is an object containing options. Because we only have two constants, we only need the first two rows of our document. This is given by setting the start and end indices of the extraction to 0 and 1. Because we know that our constant values are floating point numbers, we are passing the default float parser parseFloat as parser. The last argument is the column index. When we added the data to the DataPool we put the names in the first column and the actual values in the second. That is why we are extracting the second column (index 1) here. Because getSheetColumns can be used to extract multiple columns, it returns a list of columns (array of arrays). We only extracted one column and are only interested in the data contained there. To access only the first column we are suffixing the function call with an access call to the first index [0].
Next we extract the two constants from the column of constants that we got in the step before. We know they are the first and second element in the column. We can use the following line of code to do this:
const [pricePerKm, fuelFloater] = constants;
To get our final price we need to get the total distance that needs to be driven for this transport. We extract it like we did in our feasibility function earlier, using the utility method
getVehicleSectionDistanceSum:
const vehicleDistance = utils.route.getVehicleSectionDistanceSum(
    context.route!.routes[0].sections
 );
Now we have gathered all information we need to calculate the price. Add the following line of code:
const price = Math.round(pricePerKm * vehicleDistance / 1000 * (1 + fuelFloater / 100));
This might seem complicated at first, but it is actually pretty straightforward: To get to our end price (in cents) we multiply the price per km with the kilometers travelled (derived from the distance in meters divided by 1000) and multiply with a fuel floater factor that we obtain by converting the percentage value into decimal form (dividing by 100) and creating a factor for multiplication (by adding 1). Our result is in cents, so we round to a whole number because there are no fractions of cents. This is the complete price calculation logic and we are almost done with our pricing brick.
All that is left is to return the calculation result from our brick. Monetary values in Orbit are given as line items. A pricing brick always returns a list of line items. In this case the list only contains one item: the base line item with the price value we calculated. Add the following code before the closing brackets of the bricks function code. You can adjust the
name,vatPercentageandsubtypevalues if needed.
return [
    {
      amount: price,
      vatPercentage: 19,
      name: "Grundpreis",
      subtype: "base",
      type: "base",
      count: 1,
    },
];
Great! We created a parameterised pricing function. Now if we want to adjust the fuel floater or price per km values we do not need to edit the logic again. We can simply update the values in the DataPool and the brick will use them. In combination with time based versioning we can plan changes in e.g. the fuel floater ahead of time and do not need to update values right when they go into effect.
4. Simple Scheduling
We already implemented most of the logic necessary for our Product. The last missing piece is the SchedulingBrick that tells the system how pickup, delivery, and any intermediate stops can be scheduled. Scheduling bricks use utils.scheduling.buildSchedule() to produce a render-ready Schedule object. Let's go!
In the "ProductBricks" tab in the settings area of Orbit MissionControl, create a SchedulingBrick by clicking the "Create ProductBrick" button in the SchedulingBrick section. Enter a name and description. Click "Create".
The
buildSchedule()function accepts a list of stop configurations and returns aSchedulethat the booking wizard renders directly. Each stop defines its own scheduling options, operating hours, and disabled weekdays. For consecutive stops you can add transit constraints that enforce minimum travel time between stops. Add the following code to the body of the SchedulingBrick:
// Calculate the route duration from the context brick
const routeDuration = utils.route.getTotalRouteDuration(context.route?.routes[0]);

// Build date strings for recommendations
const today = new Date();
const yyyy = today.getFullYear();
const mm = String(today.getMonth() + 1).padStart(2, '0');
const dd = String(today.getDate()).padStart(2, '0');
const todayStr = yyyy + '-' + mm + '-' + dd;

const stops = input.request.tour?.stops ?? [];
const lastStopIndex = stops.length - 1;

const schedule = utils.scheduling.buildSchedule({
  timezone: "Europe/Berlin",
  stops: stops.map((_, i) => ({
    options: [
      {
        id: "fix",
        label: { de: "Fixtermin", en: "Fixed Time" },
        granularity: "time",
        timeInterval: { hour: 0, minute: 15, second: 0, millisecond: 0 },
      },
      {
        id: "window",
        label: { de: "Zeitfenster", en: "Time Window" },
        granularity: "timewindow-fixed",
        timewindowFixed: {
          from: { hour: 8, minute: 0, second: 0, millisecond: 0 },
          to: { hour: 20, minute: 0, second: 0, millisecond: 0 },
        },
      },
    ],
    operatingHours: input.product.operatingHours,
    disabledWeekdays: input.product.disabledWeekdays,
    // For stops after the first, add a transit constraint
    ...(i > 0
      ? {
          transit: {
            durationSeconds: Math.round(routeDuration),
            anchor: "start",
          },
        }
      : {}),
  })),
  selections: input.request.scheduleSelections ?? [],
  recommendations: stops.length === 2
    ? [
        {
          id: "standard",
          scope: "global",
          label: { de: "Standard", en: "Standard" },
          description: {
            de: "Abholung heute, Lieferung morgen",
            en: "Pickup today, delivery tomorrow",
          },
          presets: [
            {
              stopIndex: 0,
              optionId: "window",
              date: todayStr,
              windowFrom: "08:00",
              windowTo: "20:00",
            },
          ],
        },
      ]
    : [],
});

return schedule;
Let's break down what this code does:
Per-stop configuration — Each stop in the tour receives its own set of scheduling options. Here we offer two options on every stop: a fixed time (15-minute intervals) and a time window (08:00–20:00). Operating hours and disabled weekdays from the product are forwarded to each stop.
Transit constraint — For every stop after the first, we add a
transitobject. ThedurationSecondsfield is the route duration from our context brick. Theanchor: "start"means the transit clock starts from the beginning of the preceding stop's selected window. This ensures the system does not offer delivery times that are physically unreachable.Recommendations — For two-stop tours, we define a "Standard" recommendation that pre-fills pickup today and delivery tomorrow. Recommendations give customers convenient one-click presets.
Selections —
input.request.scheduleSelectionscarries any selections the customer has already made (e.g. they picked a pickup date and are now choosing delivery).buildSchedule()uses these to filter available dates and time slots on subsequent stops.
5. Tying it all together
We are now ready to create our Product. Let's go:
In the "Products"-Tab in the settings area of MissionControl, create a new Product for sales and purchasing by clicking the "Create Product" button in the sales and purchasing section. This product can be used for sales and purchasing, but as of right now will display the same prices for selling and for purchasing. In a real world scenario this would need to be adjusted either by changing pricing logic or defining separate products for sales and purchasing.
Add a name and description to the Product. These fields can be localised so that operators and customers can see the texts in their selected language.
The tooltip and info fields are displayed to customers when using Orbit Hub. We will skip these fields for now, but it is highly recommended to configure these fields when usage in Orbit Hub is intended. We will skip configuring availability restrictions as well for now, as this is an advanced feature.
In each of the four ProductBrick sections that follow, add the respective brick that we created earlier.
In the metadata section we will configure the operating hours and disabled weekdays. We are operating from 7:00 until 18:00 every day except Saturday and Sunday. Click "Create".
Congratulations! You just created your first Orbit Product. You are now able to use the Product at several integration points in Orbit, e.g. when calculating the price for a tour in the ShipmentRouter. Usage in Hub and TransportComposer require additional configuration in the shop config or associated TransportShape.
6. Working with LoadPlans
When working with loads and vehicles or vehicle classes, it's common to ask whether a set of loads fits into a given vehicle or class under specific space constraints, and how much space the loads occupy in each dimension.
Packing loads into three-dimensional space is a complex optimization problem. Orbit provides state-of-the-art algorithms to solve it. This functionality is available in ProductBrick code as LoadPlan or – more precisely – LoadPlan3D.
In the following example, we calculate a load plan to check if the loads fit into a given container and determine how much space they use in each container dimension.
1. To calculate a load plan, we use the utility function from the loads utilities. The load-plan calculation function accepts a list of loads and a list of containers. All loads are always fitted into every container. It returns one load plan for each container provided. The order of returned load plans matches the order of the containers, so the load plan at index 0 corresponds to the container at index 0.
const [loadplan] = await utils.loads.calculateLoadPlan3DsForContainers(
  input.request.tour!.loads,
  [
    {
      containerHeight: 270,
      containerLength: 720,
      containerWidth: 245,
      weightCapacity: 10000,
      accessDirection: ["Back"],
    },
  ]
);
The load plan object returned by the function contains detailed three-dimensional coordinates for every load. We could use it to build a comprehensive visualization, but in ProductBrick code that is usually not the goal. Instead, we will inspect the load plan to get some basic metrics.
Now that we have calculated the load plan, we can verify whether all loads fit in the container or whether some were placed outside due to insufficient space. We are using a utility function for this.
const doesFit = utils.loads.doesLoadPlanFit(loadplan);
If all the loads fit in the container, we can calculate how much space they occupy in the length dimension ("Lademeter"). This measurement is often used to determine transport costs by multiplying the occupied meters by a price factor. We use a utility function again and then read one of the object's properties.
const extents = utils.loads.getLoadPlanExtents(loadplan);

const ldm = extents.maxLoadingLength;
That's it. We have successfully checked whether loads fit into a given container and determined the space they occupy. We can use this information in our pricing calculation.
7. Zone based pricing
Distance is not always the right basis for a price. Many tariffs instead price by zone: the origin and the destination each fall into a named area (for example a country, a region, or a group of postcodes), and the price is read from a matrix that maps every origin zone to every destination zone. This is a natural fit for a DataPool.
The approach builds directly on the PricingBrick from step 3 — only the source of the price changes:
Create a DataPool that holds your zone matrix. A common layout uses one sheet where the first column and the first row list the zone names, and each remaining cell holds the price for that origin/destination pair. You can keep a second sheet that maps postcodes or countries to zone names, so the brick can resolve a stop's address to a zone.
In the PricingBrick, load the DataPool with
utils.dataPools.getDataPoolsByNames, exactly as in step 3.Determine the origin and destination zones. Each stop on the request carries its address, so you can read
input.request.tour?.stops[0].address.zipCode(orcountry) for the origin and the corresponding value on the final stop for the destination, then look each one up in your postcode-to-zone sheet.Read the matching cell from the matrix. Use
utils.dataPools.getSheetRowsorgetSheetColumnsto extract the relevant row and column, ormatrixToJsonto turn the sheet into objects you can index. The value where the origin row and destination column meet is your zone price.Return that value as a line item, just as in step 3.
Because the whole tariff lives in the DataPool, you can update rates or add zones by editing data — no code change — and time-based versioning lets you schedule a new price table to take effect on a future date.
8. Adjust pricing based on shipper properties
Prices often depend on who is booking, not just what is being moved. A particular Shipper may have a negotiated rate, a contractual discount, or a surcharge tied to how they are set up. When a Shipper is selected for the transport, the brick receives that Shipper — together with any custom fields (Properties) configured for it — so pricing can react to it.
The selected
Shipperis available oninput.request.shipper, and its custom fields oninput.request.shipper.properties. The transport's own custom fields are oninput.request.shipmentProperties,orderPropertiesandtourProperties.A
Shipperis only present once one has been selected — for example after choosing a shipper in Orbit TransportComposer. Always guard for the case whereinput.request.shipperisundefined, and fall back to your standard price.
A typical pattern reads a value tied to the Shipper, then applies it as a multiplier or an extra line item on top of the base price from step 3:
const shipper = input.request.shipper;
if (shipper) {
  // Property ids and names are tenant-specific configuration, so keep the
  // "which shipper gets which terms" mapping in a DataPool rather than
  // hard-coding ids or names in the brick.
  const [terms] = await utils.dataPools.getDataPoolsByNames(["ShipperTerms"]);
  // ...look up this shipper's discount or surcharge in the DataPool
  //    and adjust the returned line items accordingly.
}
Keeping the shipper-specific figures in a DataPool — rather than branching on hard-coded shipper ids or property names in the brick — keeps the logic reusable across Shippers and lets you change commercial terms by editing data. The same input carries the selected Carrier on input.request.carrier for purchasing products, so the identical technique adjusts buy-side costs.
Utility Methods
The following utility methods are available in the utils object and can be accessed within ProductBricks to perform various calculations and data manipulations.
Route
getVehicleSectionDistanceSum(sections: RouterSections[]): number
Function to calculate the distance that needs to be driven by a vehicle on a route. This excludes route sections that are travelled by e.g. ferry. This is the standard way to calculate the distance for a route. Returns the total distance in meters.
getTransitSections(r?: HereRoute): HereRouterComponents["schemas"]["TransitSection"][]
Function to extract transit sections from a given route. Returns an array of transit sections or an empty array if no route is provided.
getTotalRouteDuration(r?: HereRoute): number
Function to calculate the total duration of a route. Returns the total duration in seconds, or 0 if no route is provided.
groupRouteSectionsForWaypoints(sections: HereRouterComponents["schemas"]["RouterSection"][], originalWaypoints: Location[]): HereRouterComponents["schemas"]["RouterSection"][][]
Function to group route sections based on waypoints. Returns an array of section groups, where each group represents the sections needed to reach a waypoint.
buildRouteRequest(stops: GeocodedStop[], options: { transportMode: string }): RouteRequest
Function to build a route request object for a given set of stops and transport mode.
DataPools
getDataPoolsByNames(names: string[]): Promise<(Record<string, string[][]> | null)[]>
Function that asynchronously retrieves one or more DataPools by name. It serves as the primary method for accessing DataPools from product brick code.
If you still use the now-deprecated DataPool linking, migrate to this new function. Linked DataPools will continue to work for the foreseeable future, but DataPool links can no longer be edited or inspected using the ProductBricks UI in MissionControl.
getSheetColumns<T = string>(sheet: string[][], options: Object, ...columnIndices: Array<number | number[]>): T[][]
Function to extract and optionally transform specified columns from a sheet into a typed matrix.
getSheetRows<T = string>(sheet: string[][], options: Object, ...rowIndices: Array<number | number[]>): T[][]
Function to extract and optionally transform specified rows from a sheet into a typed matrix.
matrixToJson(data: string[][]): object[]
Function to convert a matrix of data into an array of JSON objects.
parseObjectsFromSheetRows<T>(schema: ZodType<T>, sheet: string[][], options: Object, rowIndices: number[]): T[]
Function to parse and validate objects from sheet rows using a Zod schema.
getDataPoolDimensions(sheet: string[][]): { rows: number; columns: number }
Function that determines the actual dimensions of a data pool by finding the last row and column containing a value. Works reliably even if the data pool is sparse.
Conversions
kmhToMetersPerSecond(kmh: number): number
Function to convert speed from kilometers per hour to meters per second.
Loads
calculateLoadPlan3DsForContainers(loads: Load[], containers: Container[]) => Promise<LoadPlan3D[]>;
Function to calculate a loadplan with all loads for each container given. The order of the loadplans in the return array matches the order of the containers passed in. For performance reasons it is advised to calculate all needed loadplans in one request instead of calling this function serially.
The legacy function calculateLoadPlan does not calculate a 3D load plan and is officially deprecated. If you still use calculateLoadPlan, migrate to calculateLoadPlan3DsForContainers; support for the legacy function will be removed in an upcoming release.
getLoadPlanExtents(loadPlan: StopCentricLoadPlan): LoadPlanExtents
Function that determines the maximum space occupied by loads in a given load plan. Returns an extents object containing the maximum extents used by loads along each axis.
doesLoadPlanFit(loadPlan: LoadPlan3D): boolean
Function that determines whether a load plan shows all loads fitting inside their container. If the function returns false, at least one load lies outside the container.
hasDangerousGoods(loads: BaseLoad[]): boolean
Function to check if any of the given loads contain dangerous goods.
maxWeightForStopCountAndLoads(stopCount: number, loads: Load[]): number | undefined
Function to calculate the maximum weight of loads at any stop for a given number of stops and loads.
Scheduling
buildSchedule(params: BuildScheduleParams): Schedule
The primary scheduling API. Accepts a declarative configuration and returns a render-ready Schedule object that the booking wizard displays directly. Scheduling bricks call this function and return its result.
Parameters (BuildScheduleParams):
Field | Type | Description |
|---|---|---|
|
| IANA timezone identifier (e.g. |
|
| Ordered list of per-stop configurations (at least one) |
|
| Current user selections, typically passed through from |
|
| Global-scoped one-click presets shown at the top of the wizard |
Per-stop fields (BuildScheduleStopParams):
Field | Type | Description |
|---|---|---|
|
| Available scheduling options (at least one). Discriminated union on |
|
| Operating hours constraint; each side is |
|
| Weekdays to block (0=Sunday, 1=Monday, …, 6=Saturday) |
|
| ISO date strings to block (e.g. |
|
| Epoch seconds — earliest selectable date for this stop |
|
| Epoch seconds — latest selectable date for this stop |
|
| Transit constraint from the preceding stop. Only applies to stops after the first. |
|
| Whether the stop appears in the wizard UI. Defaults to |
Transit constraint (StopTransit):
Field | Type | Description |
|---|---|---|
|
| Minimum transit duration in seconds between stops |
|
|
|
Option granularities:
"time"— User selects an exact time on a configurable interval (e.g. every 15 minutes). RequirestimeInterval."timewindow-fixed"— A fixed, non-negotiable window (e.g. 08:00–12:00). RequirestimewindowFixed: { from, to }. Optionally setsameDayCutOffTimeto hide the option after a certain time on the same day."timewindow-flexible"— User picks a window within operator-defined bounds (min/max duration, earliest start, latest end). RequirestimewindowFlexiblewith duration and boundary fields.
Recommendations (RecommendationSchema):
Recommendations are one-click presets that pre-fill scheduling selections across one or more stops. They appear at the top of the scheduling wizard (global scope) or within a specific stop (stop scope). Each recommendation contains one or more presets, each targeting a specific stop.
Field | Type | Description |
|---|---|---|
|
| Unique identifier for the recommendation |
|
|
|
|
| Display name shown to the customer, e.g. |
|
| Short description, e.g. |
|
| Optional hint indicating a surcharge applies, e.g. |
|
| One or more stop presets (at least one required) |
Recommendation presets (RecommendationPreset):
Field | Type | Description |
|---|---|---|
|
| Zero-based index of the stop this preset applies to |
|
| The |
|
| ISO date string, e.g. |
|
| HH:mm window start for time-window options, e.g. |
|
| HH:mm window end for time-window options, e.g. |
Recommendation presets cannot reference options with granularity "timewindow-flexible", because flexible windows require user interaction and cannot be pre-determined.
Tools
emptyStringToUndefined(value: string): string | undefined
Function to convert empty strings to undefined.
z
Zod library for schema validation. See Documentation here.
DateTime
DateTime
DateTime object for date and time operations. See Documentation here.
Duration
Duration object for time duration operations. See Documentation here.
getNextBookableDate(from: number, disabledWeekdays: number[], direction: "forward" | "backward" = "forward", minDaysDistance = 1): DateTime
Function to get the next bookable date based on given parameters.
getNextBookableTime(from: number, disabledWeekdays: number[] = [], openingHours: { from: TimeObjectUnits; to: TimeObjectUnits } = { from: { hour: 0, minute: 0, second: 0, millisecond: 0 }, to: { hour: 0, minute: 0, second: 0, millisecond: 0 } }): DateTime
Function to get the next bookable time based on given parameters, considering opening hours and disabled weekdays.
FAQs and Troubleshooting
Q: How do I know if my code will work? A: We recommend using the code in the basic product as a starting point to customise each ProductBrick according to your needs. The code editor's inbuilt syntax highlighting and error indication should be able to help you in most cases. If you need further assistance please don't hesitate to reach out to our customer support.
Q: My product is not displayed at an integration point where I expect it to be displayed (e.g. in Hub, ShipmentRouter, etc). How can I find out why? A: 1. check the product category (sales, purchasing) 2. check access rules 3. if using hub, check if the product is selected for offer in the shop settings. if using TransportComposer check TransportShape. 4. check the validity of Product and transport date. If transport date is before date of first version of the Product, Product is not displayed.